What can Geomagic Control X do? |
Designed for manufacturability
Use Control X to check prototypes and solve manufacturability issues, such as deformation after molding or casting.
Identify and solve manufacturing and assembly problems
Scanning provides a complete view of the part. Control X provides you with a variety of tools and flexibility to understand the possible problems and causes of parts, and to maintain normal production.
Don’t just find the problem, but solve the problem
Any inspection software can show you where parts do not meet specifications. Control X is tightly integrated with CAD and Geomagic Design X, so you can update the 3D CAD model to compensate for any problems.
Eliminate costly scrap and rework
Enable more people to inspect the parts provided by suppliers to prevent defective parts from entering the assembly process.
Accurately and consistently assess damage, deformation or wear
Scanning can even detect wear or deformation in unexpected places. Control X's automatic alignment and deviation analysis tools can easily locate and measure part wear.
Solve difficult measurement problems
Control X has tools to meet stringent quality management requirements, so you can solve complex metrology challenges. Go beyond simple alignment and color mapping.
Make predictions before parts fail
Monitor changes in part geometry over time to catch unforeseen problems and take corrective actions. Control X includes trend analysis and reports, so you can predict when parts or tools may fail.
Reduce quality control bottlenecks
Control X is very intuitive, you don't need to be a trained or experienced metrologist to use it. Combined with the portability of 3D scanning, more people in the organization can take advantage of 3D scanning-based detection.
Improve quality documentation
A 3D scan of the part creates a complete digital record of all geometry. You can perform other measurement tasks at any time, even if the part has not actually been collected yet. Discover the possible problems after six months? Just call up the scan data and check any size-no need to re-measure the part.
Why choose Geomagic Control X?
Easy to learn and use
Don't have time to become an expert in the field of inspection software? Control X is for you. With little or no training, you can start working and get test results.
Quick to use
Control X is very flexible-it will adapt to the way you work, rather than let you adapt to the way it works. In addition, the scanning native algorithm based on the CAD kernel can process large data sets quickly and easily.
Everything you need
Control X provides everything needed for industry-level inspections. You don't need to pay extra for CAD importers, scanned mesh processing tools, or leaf analysis functions.
Built for use with your 3D scanner
Use software that is completely designed for use with 3D scanners to make the most of 3D scanners. Control X is suitable for various 3D scanners, so you can add more devices and use a common software interface.
Professional detection function
Use any 3D scanner with confidence
Control X is specially built to process data from any 3D scanner. We have built direct interfaces for many common systems. You are also ready for the future-add any 3D scanner at any time without having to learn other software.
Align the way you want
Control X simplifies the alignment technology, covering every inspection scenario:
• Automatic alignment based on features
• Use constraint options for fitting alignment
•RPS, datum and 3-2-1 alignment
• Adaptive and automatic direction finding alignment
Detection of surface damage or wear
Control X can automatically insert the ideal shape of the scanned object and measure the deviation to quantify even small surface defects.
Compare scans with CAD
The exquisite and intuitive color map shows you the parts within and out of tolerance and out of range. Control X supports multiple comparison methods, including
3D, 2D cross-sections, boundaries, curves, contours, virtual edge deviations, etc. You can also get PMI native interfaces for all major CAD systems:
Iterate and explore to understand how to operate
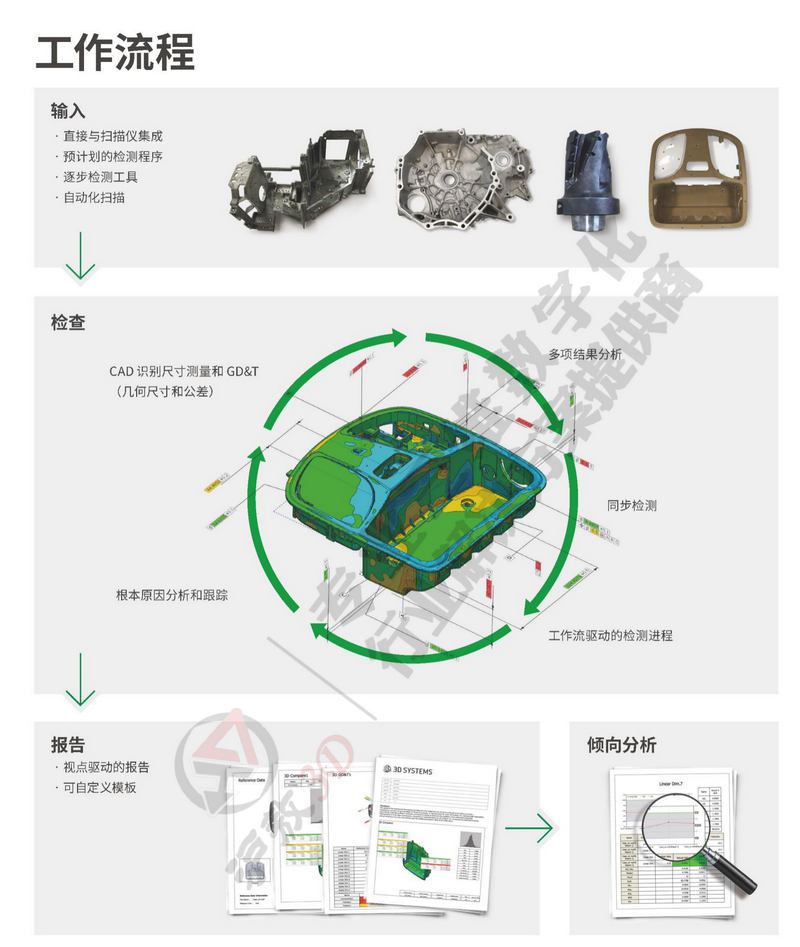
You can change any part of the detection process at any time. Try different alignment methods, different measurement methods, etc.-Control X will recalculate the entire inspection item and immediately display the updated result.
Complete the entire process automatically
Every aspect of the inspection project is recorded in the Model Manager of Control X. You can check other parts with just a few clicks, or you don't need to click at all, thanks to the included batch application, which can run in parallel on multiple PCs.
Instant size measurement
Because Control X can automatically identify features in the nominal model (whether they are CAD models or scanned copies of original parts), measuring dimensions in 2D or 3D is very fast and simple.
Provide clear and interactive 3D reports for everyone
Use templates to generate reports in the desired way. If you decide to change or add content later, don't worry about the report being updated automatically. Monitor changes over a period of time through trend analysis. Use 3D PDF to share reports so that everyone can view it on a PC, Mac or mobile phone without special software.
Combine 3D scanning with hard measurement
Take full advantage of these two functions in an integrated software interface-non-contact scanning and contact detection. Use LiveInspect™ to perform step-by-step or pre-planned inspections with graphical and audio guidance.
2D and 3D GD&T
With a wide range of geometry and tolerance tools, you can analyze the size, shape, orientation, and location of features according to the ASME Y14.5M standard. Control X can measure:
•Length, angle, radius, ellipse size, hole depth, counterbore diameter, counterbore diameter and thickness
•Straightness, flatness, roundness, cylindricity, parallelism, perpendicularity, angle, position, concentricity, symmetry, linearity, curved surface profile, runout and total runout
Compare scans with original parts
You can scan an original part and use it as a nominal model for comparison. Control X treats the scanned nominal model like a CAD model, because it automatically adds feature information for each scan (for example, it knows that the plane is a plane)
Leaf analysis
Use the included blade analysis tool to control the quality of the turbine, blisk, baffle or blade. Control X can automatically measure the following items:
• Airfoil section
• The position and thickness of the front and rear edges
•Arch arc
• Chord angle and length
• 2D distortion analysis


